Saturday, 29 December 2018
Treasures Frames and Heart - With Love

For this card I've used patterned papers from the Couture Creations Le Petit Jardin 12 x 12 paper pad and an A4 sheet of navy blue card. I've also used some additional white card to strengthen the panels cut from the patterned papers.
My card is A5 size (14.9cm x 21cm. The navy blue mat is cut to 14.5cm x 20.6cm and the patterned paper background is cut to 14cm x 20.1cm. I've gutted the centre out of the navy blue mat (leaving a 2cm border, and used that card to cut the lace strip and the flowers from.
Cut/Foil 2 of the large frame from the Treasured Frames set onto the patterned papers - one using dark blue foil, and the other using holographic silver foil. With both, add a layer of white card behind the patterned paper, so that it is cut and embossed at the same time as the patterned paper is foiled. I find it best to cut the middle out of the foil, so that foil does not adhere to the card in the centre of the frame.

Cut Iridescent Blue/Green foil a little larger than your heart die and stick it down to some navy blue card. Foil the sentiment into the centre of the foil, slide some paper or card under the foil to mask the sentiment and then use the back of the cutting die to foil a heart around the sentiment. You;ll need a thin metal shim on your GoPress and foil to do this
It's basically the same technique as shown in this video, but the cutting die is a heart instead of a fancy oval. Once you've foiled the heart, flip the die over, line it up carefully (tape in place) and die cut the heart.
Cut and foil the Key from the treasured frames set using the same foil and navy blue card. Also die cut the key from some more white card so you can add an extra layer for strength.
Use the Petit Floral Edge border die - cut twice, back to back to create the lace strip.

 Place the Treasured frame foiled in silver horizontally across the other one and stick in place. Make sure you leave space at the bottom of the card for the lace strip, and stick the frames onto the card front using foam pads at the top of the card.
Stick the heart on top of the 2 frames using more foam pads, and then use foam pads to mount the key at the edge of the heart.
Stick the Petit Floral Edge border, lace strip in place across the bottom of the card.
I've foiled some of the navy blue card with the foil cut from the centre of the foil used for the Treasured Frames, and used it to make flowers. I've cut 4 each of the Evening Branch die from navy card and white card.
Arrange the flowers and Evening Branch mini die cuts at the bottom left corner of the frames, overlapping the lace panel.
Full details of how to put the elements of the card together are in the video.
Couture Creations Products Used:
CO726468 - Modern Essentials Cut, Foil and Emboss dies - Decorative Nesting Treasured FramesCO725434 - Le Petit Jardin - LE PETIT JARDIN 12 X 12 PAPER PAD
CO725454 - Le Petit Jardin - PETIT FLORAL EDGE DIE (1PC)
CO725937 - Le Petit Jardin - EVENING BRANCH MINI DIE (1PC)
CO725289 - Anna Griffin - With Love Hotfoil stamp
CO725392 - Foil - Blue/Green Foil (iridescent finish)
CO725352 - Foil - Silver (Iridescent Finish)
CO725393 - Foil - Navy Blue (Light Iridescent Finish)
Wednesday, 19 December 2018
Primrose Layers and Bracket Frames

For this card I've used two of the cut, foil and emboss dies from the Couture Creations Modern Essentials, Bracket Frames set, and the Primrose Flower hot foil stamp from the Le Petit Jardin collection, to create both the background and the topper.
My card is A5 size (14.9cm x 21cm). I've cut a mat from some dark purple metallic card 14.4cm x 20.6cm, and then cut a piece of white card for the background 14cm x 20.2cm.

The white card is 300gsm stamping card, which I've chosen to use because I want a good card for colouring the flower after I've foiled it. I find I need a little more pressure for foiling on this card than I do when foiling of 250gsm smooth white card, so I use 3 card shims instead of my usual 2.
I've used a strong coin magnet - the type used with stamping platforms, to achieve precise positioning of the sentiment and primrose hot foil stamps. See my video for details of how to do this, if this technique is new to you.
I used some water based marker pens and a water brush to colour my flower, but you can use any water based medium as the foil will resist any water based product. I've also tried watercolor pencils, gel pens, mica water colour paints and pigment stamping inks.
 For the Modern Essentials cut, foil and emboss dies, you need to use one or two thin metal shims on your GoPress and Foil - I use one metal shim with a piece of 300gsm card underneath it, but what work best for you will depend on your personal die cutting machine.
For the Bracket Frames, counting from the largest size inwards, I've used the 2nd die to cut and foil the patterned paper layer and the 4th die to cut and foil the white card.

The same primrose flower hot foil stamp is used to create the foiled decoration on the white card background - foiled in silver. I've also used the Couture Creations Anna Griffin Happy Birthday hot foil stamp to foil the sentiment. I've used purple foil to co-ordinate with the colors in the patterned paper and my colored flower on the topper.
Couture Creations Products Used:
CO725424 - Le Petit Jardin - Primrose Flower Hotfoil StampCO725434 - Le Petit Jardin - LE PETIT JARDIN 12 X 12 PAPER PAD
CO726459 - Modern Essentials Cut, Foil and Emboss dies - Bracket Frames
CO725288 - Anna Griffin Hot Foil Stamps - Happy Birthday
CO726053 - Heat Activated Foil - Purple (Deep Mirror Finish)
CO725350 - Heat Activated Foil - Silver (Mirror Finish)

Wednesday, 5 December 2018
Treasured Frames Floral Toppers
Treasured Frames Floral Toppers
Here are two design ideas for the Couture Creations Modern Essentials Treasured Frames and Bracket Frames cut, foil and emboss dies.

When using the Modern Essentials cut, foil and emboss dies I have my GoPress & Foil set up with one or two 300gsm card shims on the hot plate, and then I have a thin metal shim on top of them.
The thin metal shim is the type you use with a die cutting machine when you are cutting fabric or need extra pressure to cut very intricate dies. Any A5 size (15cm x 21cm) thin metal shim should do - but they vary a little in thickness so you might need more or less card shims underneath yours, and the number of card shims can also vary depending on your die cutting machine.
Or, you can use 2 metal shims.
I have 2 5"x7" 300gsm card shims that I keep with my thin metal shim, so they are always there ready for me to use.
My cards are A5 size (14.9cm x 21cm).
I've cut the card for the mat behind the patterned paper to 14.5cm x 20.6cm and this is the same card that I've used to make the toppers and sentiment. If you are careful, you can gut the centre of the card and have a large enough piece to make the topper, or use another piece of the same card.

I made the topper using a piece of card 13cm x 19cm as you need a little extra space around the Treasured Frame die to tape your foil and die down to the card - full details are in the videos.
Working with the blue card, I only needed one card shim under the metal shim on the GoPress & Foil, but the purple card is a heavier weight and slightly textured so I needed 2 card shims under the metal plate so that it would foil and cut properly.

I've also figured out a great way of placing foiling in exactly the right place - such as inside the foiled edge of the Treasured Frame. Hold the decorative hot foil stamp in position with one hand and with the other place a strong magnet covered in masking tape (the sort used with stamping platforms) on the back of the card to hold the hot foil stamp in place.


On the purple version I foiled the frame in exactly the same way and used the Thin Fern hot foil stamp to add the decoration inside the frame. As the centre point is offset to the left, you need to let the hot foil stamp cool down after foiling the first set of ferns and then re position it to foil the second set.
Once the foiling is completed, stick the Treasured Frame piece down on your card and add some die cut flowers and foliage to complete the topper.
To make the sentiment, cut a piece of foil a little larger than the Bracket Frame cut, foil and emboss die, and use some low tack tape to stick it in down in the centre of the piece of card.

Foil the words in the centre of the card, then slide a small scrap of card under the foil to cover most of the words - this prevents extra foil adhering to the card when the frame is foiled.
Position the Bracket Frame cut, foil and emboss die over the words and tape it down.
Set up the GoPress & Foil with your card shims and metal shim (as for the Flourish Frame) let them heat up.
 Place the Bracket Frame die on the GoPress & Foil, on top of the metal shim, with the card on top. Allow it to heat for about 30 seconds and then roll through your die cutting machine.
Mount the sentiment on some foam pads to that it over laps the bottom right corner of the Flourish Frame, and add some more die cut flowers on its left to complete the card.


The videos are very detailed instructions. If you've had plenty of experience using your GoPress and Foil, then you may want to fast forward through some parts. The magnets I use are "neodymium magnets" which are very strong. They are used to hold things in place on stamping platforms. I've bought some extra ones and covered them in masking tape to make them easy to slide away from whatever they have stuck to.
Treasured Frame topper on purple card
Treasured Frame on Blue Card
Bracket Frame sentiment on purple card
Bracket Frame Sentiment on blue card
Couture Creations Products used:
CO725426 - Le Petit Jardin - Floral Wreath Hot Foil Stamp
CO726459 - Modern Essentials Cut, Foil and Emboss dies - Bracket Frames
CO725288 - Anna Griffin Hot Foil Stamps - Happy Birthday
CO726468 - Modern Essentials Cut, Foil and Emboss dies - Decorative Nesting Treasured Frames
CO725747 - C'est La Vi e- Thin Fern Stalks Hotfoil Stamp
I also showed:
CO725745 - C'est La Vie - Rosie Bouquet hotfoil stamp
CO725424 - Le Petit Jardin - Primrose Flower hot foil stamp
Monday, 19 November 2018
Floral Squares Card
Floral Squares Card
Featuring Couture Creations Le Petit Jardin Collection

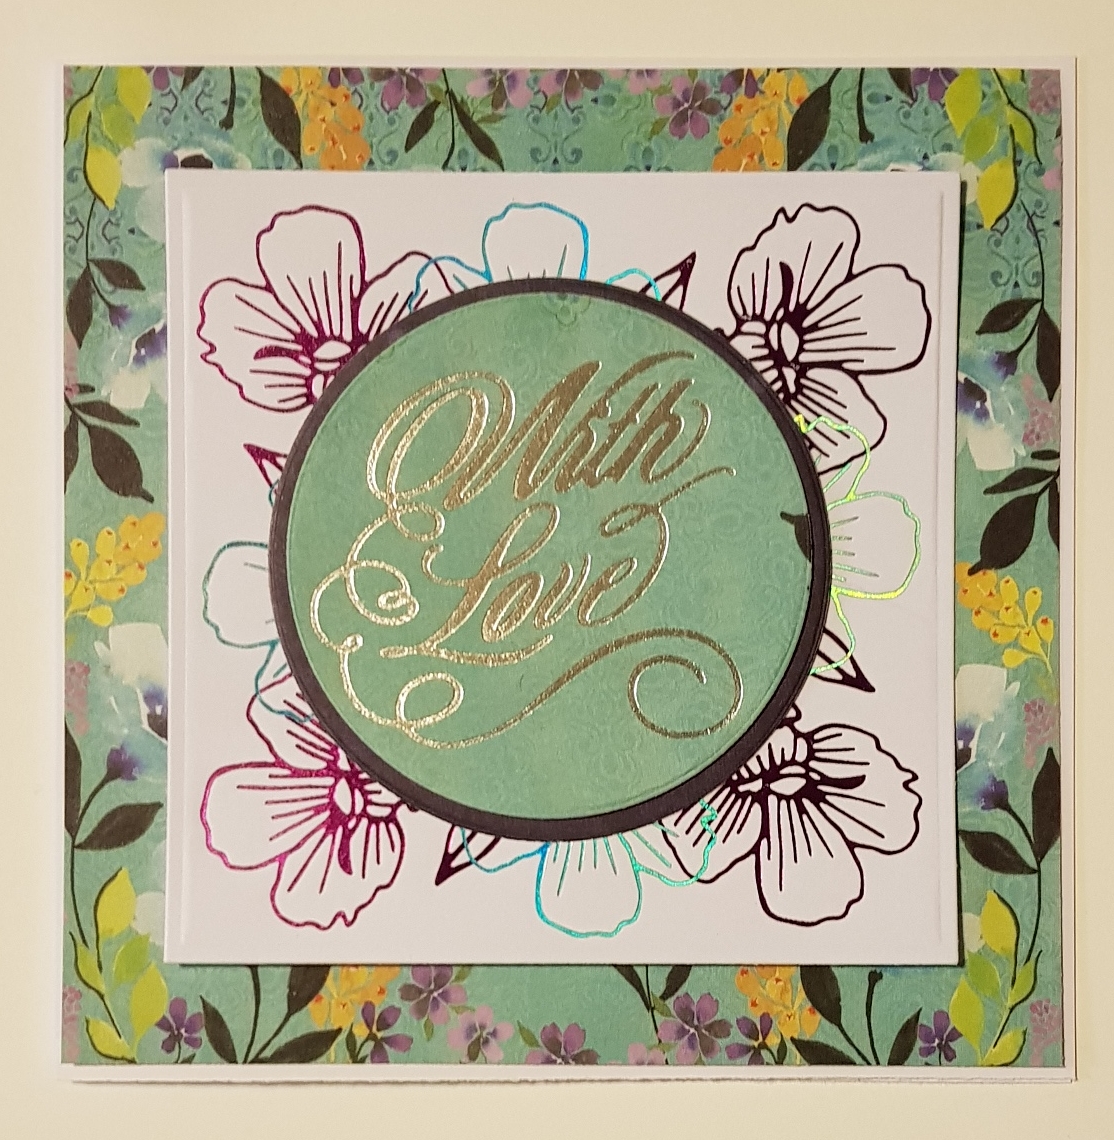
This is a really quick card (yes even with all that foiling). I've used pages from the 6 x 6 Paper pad, and just one hotfoil stamp to create the square foiled panel. I've foiled a sentiment, but you could die cut or stamp and emboss a sentiment instead.
I've used a sheet of A4 card to create my card blank, so its 14.9cm square, which is a little smaller than 6 inches, so I've trimmed my paper down by 4mm on each side so that it fits onto my card blank with a small white border from the card blank showing.
I've used the centre of my 6.x 6 page for my sentiment - If you are going to do this, do the foiling first before cutting the circle out of the centre of the page. See my video (link at the bottom of page) for great tips on positioning your hotfoil stamps.

Cut the sentiment out of the centre of your paper using a round die.

Die cut an 11.5cm square piece of white card.
Position the Primrose Flower hotfoil stamp on your GoPress & Foil so that the flower will be in one corner of your card with the end of its stem in the centre of the square. See the video.
Foil the flower (I've used Phantom Purple foil), leave the hotfoil stamp on the GoPress & Foil, add more foil and turn the card 1/4 turn and foil in the next corner. Repeat this process for all four corners.

Remove the hot foil stamp from the GoPress & Foil and allow it to cool for a minute or two.
Position the Primrose Flower so that the flower is in the space between the corner flowers, along one of the edges. I used Blue/Green Iridescent foil for these. As before, foil the flower on each side by turning the card 1/4 turn each time.

Cut a mat layer for your sentiment using a slightly larger round die, from a contrasting paper from the pad or some contrasting card.

Stick down your foiled square in the centre of your patterned paper, and add the round sentiment in the centre of the square.
CO725424 - Le Petit Jardin - Primrose Flower Hotfoil Stamp
CO725289 - Anna Griffin - With Love Hotfoil stamp
CO725392 - Heat Activated Foil - Blue Green (Iridescent Finish)
CO726053 - Heat Activated Foil - Purple (Deep Mirror Finish)
Wednesday, 14 November 2018
Golden Flourish Card
Golden Flourish Card
featuring Couture Creations Le Petit Jardin Collection

For this card I've used some gold card stock and two of the papers from the Le Petit Jardin 12 x 12 pad, along with the Midday Corner Decorative die and the Jardin Doily Mini die to create the background.
For the topper, I was undecided which way to make it, so I've made several versions. In the photo above, I've used the Frame from the Ooh La La Framed Owl set, and the With Love sentiment hot foil stamp from Couture Creations Anna Griffin collection, but I also had lots of other ideas for the topper - shown below.

As you can see it works well with plain nested ovals, with the oval frame or other layering die sets as a frame; and the sentiment can be foiled, die cut or heat embossed using gold embossing powder, using whatever you have.
I've made an A5 size card (21cm x 14.9cm) so start by cutting a piece of gold card to 20.6cm by 14.5cm (4mm smaller than A5).
Die cut 2 of the Midday Corner from gold card.
Cut a piece of the dark purple paper to 20.2cm x 14.1cm (8mm smaller than A5) and a strip of the floral paper 9.5cm wide.
Lay out the corners on the purple paper in the top right and bottom left corners - but don't stick them down yet.
Position the strip of floral paper diagonally across the backing paper, between the corners, and use some low tack masking tape or repositional tape to hold it in place on both of the long edges as shown below.

Then the corners can be taken off, and the papers turned over so that some of the excess can be trimmed away from the corners - but don't trim away all of the excess at this stage.

Turn the papers back over so that you can see the front and release one of the pieces of tape holding the diagonal strip in place.
Fold the strip back (hinged by the remaining piece of tape) and add double sided tape (or glue if you prefer) to the back. Remember that you still need to trim off some of the excess at the corners, so don't go right up to those edges.

Lay the strip back down across the purple backing paper, and stick it in place. The second piece of masking tape can now be removed.

Turn the papers over to the back again and trim the excess off the diagonal strip, flush with the edge of the purple backing paper.

Layer the papers onto the gold card and stick down on your card blank, and then stick the corner die cuts in place.
Cut 2 of the Jardin Doily mini die and trim so that they have a square corner. Stick these in place in the corner of the diagonal strip.
Create the topper using the purple paper as the background with either a sentiment cut from the same gold card as the corners, stamped and embossed with gold embossing powder, or foiled. Cut out and add to the decorative frame, or just layer up some plain ovals cut from gold card and more or the purple paper.


To save some of the purple paper, I cut my smaller oval out of the larger one and backed the larger one with some black card.


And here is what the card looks like with some of the versions of the topper.


CO725434 - Le Petit Jardin - Le Petit Jardin 12x12 Paper Pad
CO725933 - Le Petit Jardin - JARDIN DOILY MINI DIE
CO725943 - Le Petit Jardin - MIDDAY CORNER DECORATIVE DIE
CO725289 - Anna Griffin - With Love Hotfoil Stamp
Friday, 2 November 2018
Le Petit Jardin - Sunflowers and Roses
Sunflowers and Roses Card
using Le Petit Jardin Collection from Couture Creations


This is an A5 (21cm x 14.9cm) card, so you need to cut a piece of the floral paper to 20.2cm x 14.1cm. You also need a piece of the dark purple paper 5cm wide and 20cm long and a piece of the striped paper 4cm wide and 20 cm long.
Stick the strip of striped paper in place down the middle of the dark purple strip, with an even border on either side.
Cut the layered strip into two pieces about 4cm from one end.
Stick the layered strip in place about 1cm from the left hand edge of the floral paper as shown below, leaving a gap where the strip has been cut so that it can over hang the edges of the floral paper a little at both ends (so that it can be trimmed flush with the floral backing paper).

Turn the backing paper over and trim the ends of the strip flush with the edges of the paper.
The backing paper (with the attached strip) can now be stuck down on our A5 card blank.
Use the Floral Wreath hot foil stamp to foil onto the dark purple paper, and cut out using a 6.5cm square die. Mat onto a die cut squire of lilac card.

Foil using the Floral Arrangement 2 hot foil stamp onto some smooth white card, positioned so that it will be in the bottom right corner when you cut a 9cm square from the card. You get a neater edge if you foil first and then die cut the square so that only the flower and part of the leaves are on the topper. There's a link to my video of how to do this at the end.

Stamp a sentiment in black onto the foiled card, and use the sunflower stamp to add more decoration. I used pigment stamping pads to stamp in colors that coordinate with the colors in the backing paper, then pressed the ink pads onto my glass mat to release some ink which I picked up with a water brush fill in some color on top of the stamping. I used the same inks to add subtle color to the foiled sunflower.
Once dry, mat the foiled topper onto some Lilac card.
Cut 2 of the Sunlit Rosebud mini die, one in lilac and one in white. Stick the white one down on lilac card and cut around the edge, and stick the lilac one onto white card and cut around.
Cut 2 of the Evening Branch Mini Die in white card.
Stick the toppers in place using foam pads.
Arrange the roses and Evening Branch die cuts in the bottom right hand corner of the card.

Topper Video
CO725434 - Le Petit Jardin - Le Petit Jardin 12x12 Paper Pad
CO725426 - Le Petit Jardin - Floral Wreath Hot Foil Stamp
CO725427 - Le petit Jardin - Floral Arrangement 2 Hot Foil Stamp
CO725937 - Le petit Jardin - Evening Branch Mini Die
CO725940 - Le Petit Jardin - Sunlit Rosebud Mini Die
CO725437 - Le Petit Jardin - Sunflower mini stamp.
Subscribe to:
Posts (Atom)