Sunday 24 February 2019

Butterfly Garden - Treasured Frames Center Stepper

Butterfly Garden - Treasured Frames Center Stepper


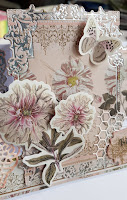
For this card I've used the Couture Creations Modern Essentials, Treasured Frames cut, foil and emboss die set with some of the beautiful 12"x12" papers from their Butterfly Garden collection, along with elements from the Butterfly Garden ephemera pack.

The card base is made from a sheet of 300gsm, white A4 card, or if you prefer to work in imperial measurements (inches) you can trim your card to 11" long.  The important thing is to know what the measurement is from the card edge to the centre fold of the card.  For A4 this is 14.9cm, and for 11" it is 5 1/2".  If you are working with a scoring board it is easier to work in inches, as the score lines line up exactly with the 1/8" marks.

To fit the panels cut by the smaller frame in the Treasured Frames set, the side panels of the card base need to be 6cm  or 2 3/8" wide.  The middle panel can be whatever is left once you have these each side.  On my card it's 9cm wide and the panel cut with the large frame in the set is approximately 10.5cm - so it over hangs the base card on both sides.

Here are guides for where to score and cut your card base.  I explain the method in my Centre Stepper Card Base video.

11" Card - Imperial Measurements (inches)

A4 Card - Metric Measurements (cm)
I laid the dies out on my sheet of 12x12 paper to decide what areas I would use for my 3 panels.
I trimmed these areas out of the large sheet so that I had pieces that would fit on the hot plate of the GoPress and Foil, and foiled these using silver foil.  As this is paper rather than card, I also used a layer of 250gsm card as this reinforces the paper for the embossing, I then stick the 2 layers together after cutting and foiling the paper.

I used a strip from the ephemera pack, matted onto a length of the patterned paper along the bottom edge of the stepper card.


Once the panels are made its just a matter of sticking them in place on the card base and adding embellishments.  I've used flowers from the ephemera pack and die cuts using some of the mini dies from the Butterfly Garden Collection.

 I've used flowers from the ephemera pack and die cuts using some of the mini dies from the Butterfly Garden Collection.

The flower have been given some dimension, using Couture Creations black foam pads.

Center Stepper Card Tutorial


Using the Treasured Frames Cut, Foil and Emboss dies with 12x12 papers

Couture Creations Products Used

CO726540 - Butterfly Garden - Diecut Ephemera Set - Assorted Sizes
CO726552 - Butterfly Garden - Beehive mini die
CO726541 - Butterfly Garden - Woven Heart
CO726531 - Butterfly Garden - Sheet 4, 12x12 paper  or CO726526 - Butterfly Garden - 12 x 12 paper pad
CO726468 - Cut, Foil and Emboss Modern Essentials - Decorative Nesting Treasured Frames
In my video you also see me use:
CO726343 - Mini Guillotine Trimmer
CO726342 - 12 x 12 Scoring Board


Friday 8 February 2019

Diamond Corners and Treasured Frames

Diamond Corners and Treasured Frames


For this card I've used a page from Couture Creations L'Aquarelle 6"x6" paper pad foiled with the Modern Essentials Treasured Frames Cut, Foil and Emboss die - the large frame in the set.  As I've used a paper pad (not as thick as card) I've added a layer of card on top  when I've foiled the paper, and then stuck the layers together to make a more substantial topper.

Foiling the Rectangular Frame

To avoid over foiling in the centre area of the frame, I like to cut the middle part of the foil out using a craft knife, or you can cut you foil into strips and lay them around the edges of the frame.  I show you how to do this in video 1.

Cut your foil to size and and then lay it on a piece of copy/printer paper, with the Treasured Frames Cut, Foil and emboss die on top, cutting/embossing side down.  The paper is to protect the underside of the foil from damage.

Use a craft knife to cut the foil a few mm (about 1/4") inside the edge of the die.  The paper gives the blade something to cut into so you have more control than if you work directly on a glass mat.

Lay the foil on the patterned paper, and tape the die in place on top of it.  Then trim any excess away from the edges.  This will allow you to position the cut, foil and emboss die in the centre of the GoPress hot plate.

The Modern Essentials Cut, Foil and Emboss dies need 2 thin metal shims on the GoPress to protect the non-slip surface of the hot plate, and to provide enough pressure to cut and emboss.  I use 2 card shims instead of 1 of the metal shims, and this seems to give me just the right amount of pressure.  It will depend on your die cutting machine, and the thickness of your thin metal shim.  The Couture Creations "Conversion Plate" is likely to give too much pressure when used with the Modern Essentials Frames.


Lay the die and card on the GoPress with the back of the die against the metal shim, cutting side up with the patterned paper on the top.

Lay an extra piece of card on the top - this needs to be slightly larger than the die, so that it can also be cut to shape and embossed at the same time as you are cutting/foiling the patterned paper.

Then you just close the lid, slide the hotplate into the base, and let it all heat up to temperature.  If my GoPress and metal shim are already heated up, I normally allow the die to heat through for about 1 minute before rolling the hotplate through my die cutting machine.

Foiling the Square Frame

For the square frame I've cut the square using a standard die and then foiled using the Intricate Corner from Couture Creations C'Est La Vie collection.  My video (Video 2) shows how to align the hot foil stamp with the corner and position it on the GoPress and Foil so that you can get all for corners perfectly lined up to make the square frame.  You'll need a strong magnet like the ones used with stamping platforms for this (a neodymium magnet) covered with masking tape. 

  
Neodymium magnet covered with masking tape


  • First die cut a square from white card.  If you can, keep the die cut in the die - you may need to add some low tack tape on the back of the square if it falls out.
  • Line the corner hot foil stamp up in the corner of the card, pushed as much into the corner, against the edge of the die as you can.  The back of the foiling plate will overlap the die slightly as the raised part of the foiling plate needs to be touching the inside edge of the die (see video 2).  
  • Use the magnet on the back of the card to hold the hot foil stamp in place and carefully ease the card out of the die.
  • Put the card, with the magnet and hot foil stamp on the GoPress and Foil hot plate, with the card lined up in a corner, so you can line it up with the white edges.  I like to have the hot foil stamp in the corner of the card diagonally opposite the corner that is against the corner of the hot plate.  Hold the hot foil stamp down with the card, and slide off the magnet.  Pick up the card without moving the hot foil stamp.
  • Now you can heat up the hot foil stamp, add your foil and then put the card back in exactly the same place lined up with the corner.  Use a small piece of low tack tape to secure the card to the white edge of the GoPress hot plate.
  • Cover with shims and roll through your die cutting machine as normal.
  • Remove the card from the GoPress carefully so you don't disturb the position of the hot foil stamp.
  • Add another piece of foil, turn your card a quarter turn and position in the corner again, securing with low tack tape. Add your shims and roll through the die cutting machine.  Repeat for the other 2 corners. 

I've trimmed the piece of paper I cut off the edge of the paper used for the rectangular frame, and used it with a lace edge die cut behind the frame, lined up with the corners of the "diamond" square. Stick this in place on your backing paper before you stick the backing paper down, so that you can trim the ends flush to the edge of the paper.

Assemble the card, layering the diamond square on top of the Treasured Frame and add a die cut embellishment and a sentiment.


Video 1 - Using Couture Creations Treasured Frames 
Cut, Foil and Emboss dies pages from paper pads.


Video 2 - Working with corner hot foil stamps

Couture Creations Products Used

CO726468 - Modern Essentials Cut, Foil and Emboss dies - Decorative Nesting Treasured Frames
CO725454 - Le Petit Jardin - Petit Floral Edge Die
CO725743 - C'Est La Vie - Intricate Corner Hot Foil Stamp
ULT157762 - Ultimate Designs L'aquarelle Designs - 6 x 6 IN paper pad


Sunday 3 February 2019

Posy Thank You Card


This is an A6 (10.5cm x 14.9cm) card.  I've cut the green card for the mat to 10cm x 14.4cm, and the patterned paper to 9.6cm x 14cm. 

Cut an oval out of the patterned paper for the aperture.  Leave a larger space below the aperture than above it.   Keep the waste patterned paper to use for the sentiment.


Cut out 2 of the Framed Daisies Decorative Die Set.  Take one of the frame die cuts and trim around the large flowers, shape them with a ball tool and use them to add dimension to the flowers on the frame.  Stick together the two posy die cuts from the centre of the frame.


Use the back of the oval of patterned paper to stamp a sentiment, and cut it out.


Layer the green backing paper and the patterned paper together on your card blank.
Add the die cut frame over the aperture and stick down the flower posy in the centre of the oval.
Add the sentiment at the bottom of the card.


Couture Creations Products Used:
CO725944  - Le Petit Jardin  - Framed Daisies Decorative Die Set
CO725434  - Le Petit Jardin  - Le Petit Jardin 12x12 Paper Pad
ULT200038  - 12 x 12 Card Stock - Jungle